Graphical user interface
Disperse is more of a batch-processing type of application than an interactive application, and is primaril intended to be used from the command line.
However, a basic graphical user interface (GUI) is availablle that allows a user to select input and settings files using file chooser dialogs, and select other options using text and check boxes. The pipeline can then be launched and the results will be displayed in a text area, and may be saved to file.
Also, if the PieceMaker GUI is installed, it can be used to visualize design results by viewing the fragments produced by PieceMaker before or after the selection of a fragment subset.
Pipeline
The Disperse GUI is started by running the 'disperse-gui.sh' or 'disperse.bat' (on Windows) script.
This will launch a workbench window, with the Disperse GUI active as an internal window. If the Disperse GUI is not loaded automatically, it can be loaded from the 'Options' menu.
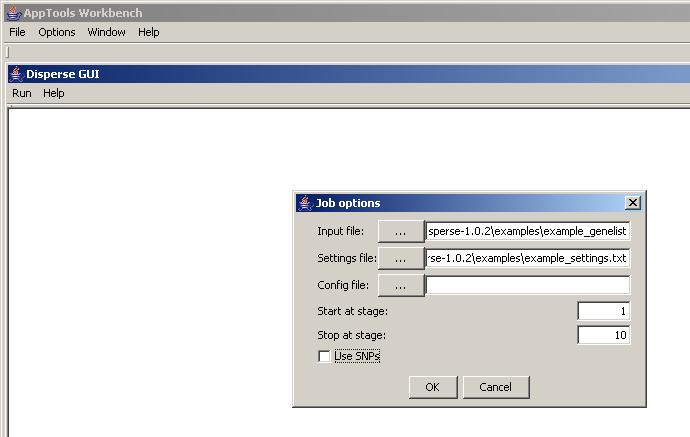
The Disperse GUI provides a 'Run' menu with two options. One option is to run the pipeline, the second option is to store the output to file.
When running the pipeline, a dialog window will appear, asking you to select input files, start and stop stages, and whether to use the SNP option. Clicking OK will start the pipeline as a separate process, and output will be displayed in the window after some time. When the run is complete, the user can select to store the output to file. The output could also be transferred to a file using cut and paste.
Just like when running the pipeline from the command line, Disperse needs to be properly set up and configured.
The results of running the pipeline from the GUI are the same as when running it from the command line.
PieceMaker visualization
To visualize the results of a design, you need to open the PiecaMaker GUI plugin in the workbench. It should be availablein the button list in the upper right corner of the workbench window. If not, you may need to activate it through the 'Options' menu.
You need to load a fragment data file (.fragment or .selection file created by Disperse step 6 or 7), and a corresponding .target file (created by Disperse step 3).
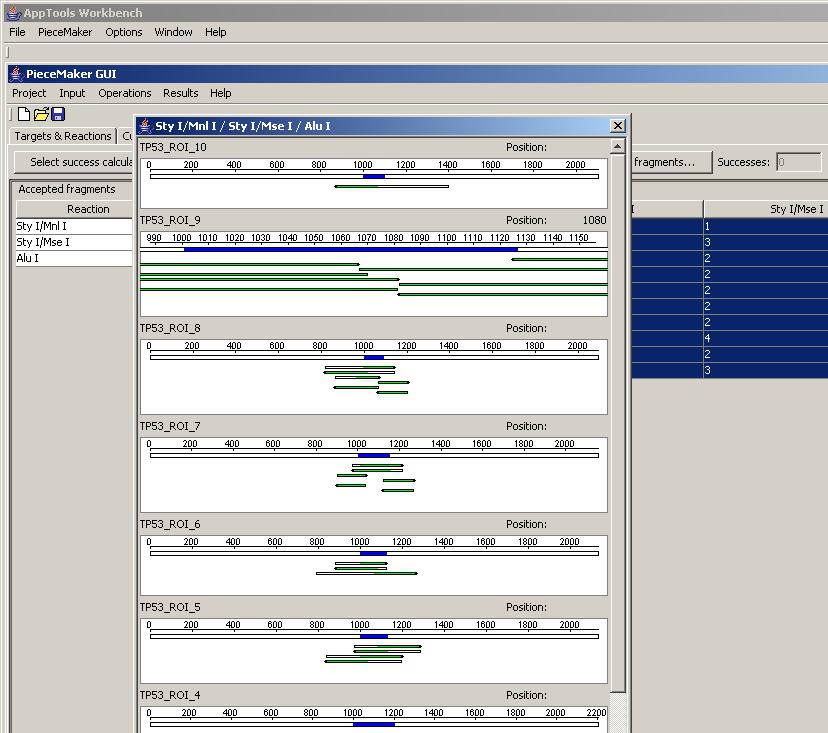
First load the target file through the 'Input' menu, then load a fragment file through the 'Results' menu. Switch to the combinations tab. On the right side you have a table displaying a row for each target, and a column for each selected restriction reaction (this requires a success criterion to be specified) The number listed in each table cell reflects the number of fragments available for this target - reaction combination. You may right-click a table cell to display a graphical view of these fragments. Right-clicking the rightmost cell will display fragments for this target for all reactions. You may also select multiple rows to display together.
After running a design job through the Disperse pipeline GUI, resulting fragments (all fragments for the selected combination of restriction reactions, or the subset selected in step 7) may also be viewed by choosing the approriate menu option in the Disperse GUI. This requires the PieceMaker GUI plugin to be loaded, as described above.
Each view displays the target as a thick white bar with a blue part representing the region of interest within that target. Each fragment is represented by a thinner white bar, with green color representing the part of the fragment that is retained flap cleavage. The arrowhead indicates the 3' end of the restriction fragment.
The PieceMaker plugin can also be used to manually perform the actions corresponding to steps 6 and 7 of the disperse pipeline, but documentation for this is outside the scope of this text.
