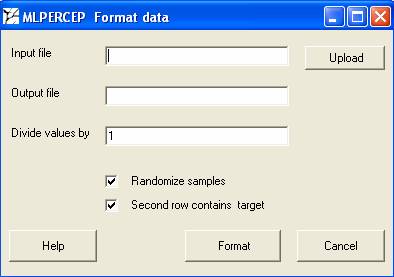
Formatting data: After you click the button format data you will get the below shown window. This program will convert your data to the format in which the training program will accept.
Your data should be in the following format.
Identifier s1 s2 s3 s4 s5 s6
Target 1 0 0 1 1 0
G1 3 8 2 9 1 2
G2 9 4 2 9 6 5
G3 3 2 7 9 3 2
First row and column should contain the word Identifier
followed by the names of identifier.
Second row first column should contain the word Target.
Following this should contain the expected output of that sample 0 for one
class and 1 for the other class. This row is essential for the training data.
However it is optional for the testing data. If this row is present the option “Second column contains target” should
be checked else unchecked. Target can be in the second row even in the testing
file. In such case it will give a comparative result with the expected
output. But then don’t forget to check
the option “Second column contains
target” in this module and also in the testing module.
The following rows should contain gene identifier followed
by expression values. All the expression
values should be numeric. There should be no missing values or
Input file: Select the file to be formatted.
Output file: Specify the output file name. This will be used for training or testing.
Divide values by: The program trains best when the data range is in between 0 and 1. So if your data is of higher range you can divide the values by a particular number so as the values falls between 0 and 1. For cDNA arrays where we use ratio or log ratio, there is no need for changing the default. If you are using Affymetrix raw values, then divide the values by 10000 in order to get optimum results.
Randomize samples: Randomize samples is always helpful for the training. However you can uncheck this option while preparing data for testing. Basically it randomizes the order of training examples fed to the program. It happens that if all positive examples are shown at one time and all the negative examples after that, then the system keeps on forgetting the previous class.
Second row contains target: It is a must for the training file. The second row should contain the known outcomes of individual samples as shown in the previous example. However it’s optional for the testing set. If you do provide the results also for the testing set, then you get a comparative result of the actual and the predicted output.
On clicking on Format, you will see a dos window as shown below and the output file will be placed in the working folder.
