Preparing document for printing:
When printing, backgrounds are automatically turned to white.
Introduction
[Menu-bar> Help>Selected topics]Making sequence alignments of related protein sequences is a common task in biology. It reveals regions which are highly conserved and are functionally important. Automatic approaches alone are often not fully satisfactory and manual refinement is necessary in most cases particularly when the sequences are very dissimilar.
STRAP is a comfortable and comprehensive tool to edit multiple protein sequence alignments. A wide range of functions related to protein sequences and protein structures are accessible with an intuitive graphical interface.
STRAP is tightly integrated into your desktop environment supporting Cut_paste and Word_completion and spell check. Drag_and_drop is available for proteins, residue selections, nucleotide structures and hetero structures. Context_menu for proteins, residue selections and files are triggered by right mouse click.
To users that are not familiar with object oriented graphical programs such as CorelDraw or PowerPoint, the program appears to be complicated in the beginning. With the help of the integrated tutorials you will learn how to apply the currently available methods to compare proteins sequences and structures.
The key features are:
- Visualization and manipulation of sequence alignments (up to 1000 sequences)
- Automatic computation of multiple sequence alignments by Clustalw and many other algorithms. It can combine amino acid sequences alignments and protein structure alignments.
- Loading protein files from public databases
- BLAST searches
- Structure prediction
- 3D-visualization using either PyMol, OpenAstex or Jmol
- 3D-superposition of C-alpha atoms
- Dot-plots
- High quality PDF output by LaTeX/TeXshade
- Project safety by included backup system
- Translation of nucleotide sequences to amino acid sequences
- Residue selections
- Highlighting text patterns
- Residues adjacent to ligands
- Text annotations of residues including:
- Notes
- Hyperlinks
- 3D-rendering commands
-
Optimized performance
- Reduced memory consumption
- Extremely fast loading of proteins
- Cache for computed results such as alignments and Blast-results
What it cannot do:
- Alignment of nucleotide sequences
- Docking
- Gene structure, promotor analysis
- Structure modelling
- Molecular dynamics
- Gene expression
- RNA-3D-structure
Frequently occurring buttons
 Help
Help Program parameters such as Gap penalty
 Program settings
 Show/hide
 Color
Color Closing a view without loss of data
 Discard
Selecting objects and using context menus
[Menu-bar> Help>Selected topics] Context menus in STRAP: The term is commonly used for menus which pop up when right clicking (right mouse button) an item in a graphical user interface, offering a list of options which vary depending on the item selected. Watch movie MOVIE:Context_Menu*Context menus are available for example for proteins, for residue selections, for the alignment panel and for the rubber band selection.
Selecting single items: List items are selected simply by left-click the respective node. Single residue selections in the alignment panel can be selected by clicking with the Ctrl-key.
Selecting more than one item: Selecting more than one list item requires the Shift and Ctrl keys. The Ctrl-key is located at the lower left of the key board and is sometimes labeled Strg and the Shift-key is sometimes termed "UMSCHALT".
Selecting residue selections: Residue selections which are highlighted in the alignment panel can be selected by Ctrl+left-click. Selected residue selections are indicated by marching ants. By dragging a rectangular region in the alignment, all contained residue selections are selected. With the Shift or Ctrl-key the union-set or cut-set is formed between already selected items and those inside the rectangle.
Frequently used menu items can be dragged out the menu and placed on the desktop. Instead of clicking a menu-item the user drags the menu-item to the desktop. Being on the desktop, it can now be accessed much easier. When the menu-item on the desktop is not needed any more, it can be deleted.
The tree view is located at the left of the application. It is usually hidden and can be opened by dragging the vertical divider bar. The tree contains all loaded proteins and their child objects.
Menu-bar
Undock: Frequently used menu items can be dragged to the desktop.Context-Menus in STRAP
are opened by right click (see MOVIE:Context_Menu*Context menu of Proteins
Context menu of residue annotations
Context menu of residue selections
Context menu of files
Context menu of rubber band selection
Context menu of alignment panel
Project folders
[Menu-bar> Help>Selected topics>Loading files] Each alignment project is stored in one file directory. This file directory is specified by the user at the beginning of the session and is valid during the entire session. Two instances of Strap for different projects can be run at the same time. Proteins and residue selections can be copied from one to the other via Drag'n drop.Loading protein files: Protein files are loaded into STRAP by dragging one or more files from the desktop or any other location into the STRAP-application.
Web-pages may contain links to protein databases. These links can be dragged from the web browser into STRAP ( DRAG_LINK* for details).
Several STRAP-sessions can be opened at the same time and proteins can be dragged from one to the other.
The sequence alignment panel
[Menu-bar> Help>Selected topics>Alignment panel] The central view of the STRAP application is the alignment panel. It shows the names and sequences of loaded proteins. The protein labels can be dragged up or down in the row header to change their order. In the amino acid sequences white space can be added or removed, so-called alignment gaps.Multiple alignment windows: If two or more alignment views are displayed at the same time (New alignment panel[Alignment-Contextmenu>New ] ), they display the same alignment. But if two independent Strap sessions are run in parallel, both display different alignments. Proteins and residue selections can be exchange copied from one to the other by Drag-n-Drop.
Shading: Three residue shadings are available in the tool-bar: "charge", "hydropathy" and "chemical". Alternatively, secondary structure can be highlighted: Helices are painted red and sheets yellow. Further GUI controls are in the context-menu.
Editing: Manipulation of the multiple sequence alignment is performed with the keyboard. STRAP has many sophisticated keyboard commands. Please see Keyboard[Menu-bar> Help>Selected topics>Alignment panel] .
Cursor: The cursor position is shown as a flashing white rectangle in the alignment window. Usually only the alignment row containing the cursor is changed when for example a gap is introduced by pressing the space bar. If more than one protein is selected, then gaps are introduced into all selected proteins.
Residue selections are highlighted in the multiple sequence alignment. When the mouse is over a highlighted residue a balloon message appears. Right-click opens the context menu and Ctrl+left-click selects the selection. It can also be selected by dragging a rectangular region.
Scrolling: The horizontal scroll-bar outlines the entire alignment and shows selections and plots. It can be enlarged with the mouse. If there are many proteins the vertical scroll-bar is visible. But also the horizontal scroll-bar can scroll vertically. Try mouse wheel turning with and without Shift and Ctrl.
Keyboard
[Menu-bar> Help>Selected topics>Alignment panel] The keyboard is used to move the alignment cursor and to introduced/removed alignment gaps.| ← | Left |
|---|---|
| → | Right |
| Ctrl+← | To first residue |
| Ctrl+→ | To last residue |
| Alt+→ | To next gap |
| Alt+← | To previous gap |
| Home | To first row |
| End | To last row |
| Ctrl+Home | To first residue |
| Ctrl+End | to last residue |
| PgDown | Scroll down |
|---|---|
| PgUp | Scroll up |
| Shift+PgUp | Scroll left |
| Delete | Delete gap right from or under cursor |
|---|---|
| Backspace | Delete gap left from cursor |
| Ctrl+Delete | Delete next gap right from the cursor |
| Ctrl+Backspace | Delete next gap left from cursor |
| Ctrl+Shift+Delete | Delete entire white space under cursor |
| Ctrl+Shift+Backspace | Delete entire white space left from cursor |
| Space | Insert gap under cursor |
|---|---|
| Insert | Insert gaps until next residue in above row is reached. |
| Ctrl+Ins | Remove gaps until previous residue in above row is reached |
| Shift+Ins | Insert gaps until next residue in below row is reached |
| 4 2 Space | Insert 42 gaps |
|---|---|
| 4 2 Delete | Delete 42 gaps |
| > | Move right |
|---|---|
| < | Move left |
| Ctrl+W | Close alignment panel |
|---|
| Ctrl+K | Close protein |
|---|---|
| Ctrl+* | Display letters in better quality |
| U | Upper Case |
| L | Lower Case |
| Ctrl++ | Zoom in |
|---|---|
| Ctrl+- | Zoom out |
| 4 2 i | Move cursor to residue index 42 |
|---|---|
| 4 r | Move cursor to 4th row |
| 4 2 c | Move cursor to column 42 |
| 4 2 n | Move cursor pdb-number 42 |
| S | Save current cursor position |
|---|---|
| s | Revert cursor position previously saved |
| 4 S | Save current cursor position to "4" |
| 4 s | Restore cursor position previously saved in "4" |
The mouse actions follow general conventions:
-
Sequence alignment
- Left-click sets the cursor.
- Middle-click sets the focus without changing the cursor.
- Right-click opens a context menu either for the alignment pane, for a residue selection or the rubber band selection.
- Dragging creates a mouse selection.
- Dragging over more than one rows creates a rectangular region. Residue selections and annotations within the rectangle are selected. Shift-key for union-set and Ctrl-key for cut-set similar to the program gimp or the MS-Window desktop.
- Alt+Drag scrolls two-dimensionally. Under Unix/Linux also hold Shift-key
-
Row-header
- Dragging up/down changes the order of proteins.
- Ctrl+click selects or deselects the protein.
- Right-click opens a context menu for the protein.
-
Scroll-bar or alignment pane
- Wheel: Scrolls.
- Shift+Wheel: Scrolls vertically
- Ctrl+Wheel: Zoom.
| G x | Define all currently selected proteins as group "x". |
|---|---|
| g x | Load and select proteins of sequence group "x" if not already loaded. Select these proteins. |
| h x | Hide all proteins of sequence group "x". |
| u x | Unselect all proteins of sequence group "x". |
Sequences can be grouped. Groups are designated by a digit or letter. The names of all proteins of a group are listed in a file in ./annotations/sequenceGroups/.
Alignment Gaps
[Menu-bar> Help>Selected topics>Alignment panel] When there are gaps occurring in all loaded sequences at the same position they are usually not displayed.Consider the following case:
ASGATA  YTG
ATGATG  YTA
ASGGTAG FSG
       ^
This is a common gap which is not displayed. The view shows:
ASGATA YTG
ATGATG YTA
ASGGTAGFSG
When the sequence "ASGGTAGAFSG" was added to the multiple sequence alignment the gap would not be a common gap any more and would become visible. In the multiple sequence alignment panel is the following:
ASGATA  YTG
ATGATG  YTA
ASGGTAG FSG
ASGGTAGAFSG
This is the reason for the following phenomenon: When gaps are added to one sequence it might seem that gaps are erased in all other sequences instead.
Drag-and-drop
Drag and Drop
| D r o p p e d O b j e c t s | ||||
|---|---|---|---|---|
| Drop target | Proteins | Residue selections | Hetero groups | Images |
| Proteins |
Copy residue selection to target protein | Add heteros to target protein | Set icon image | |
| Residue selections |
Set background image | |||
| 3D-View |
Add 3D-structure to view | Highlight atoms/amino acids in 3D | Add hetero structure to view | |
| Alignment panel |
Load or un-hide protein | Copy selection to protein | Add heteros to protein | |
| Desktop or file browser |
Copy protein file | Write PDB-file | ||
Translate Genbank nucleotide files
The Genbank file format and Embl file format are widely used file formats for annotated nucleotide sequences (format specifications: http://www.ncbi.nlm.nih.gov/Sitemap/samplerecord.html and ftp://ftp.ncbi.nih.gov/genbank/gbrel.txt and http://www.ebi.ac.uk/embl/Documentation/User_manual/usrman.html). After loading a Genbank or Embl file, the nucleotide sequence is initially shown. Only after translation into amino acids, the amino acid sequence is shown. The translation is directed by a the CDS-sequence-features within the protein file. Example:CDS 5. .799 /gene="Psmb5" /product="proteasome subunit X"If the Genbank file contains several genes the user can choose one of them.
3D-visualization in Strap
Menu-bar: If the user clicks inside the 3D-view, the menu-bar of the 3D-view and the 3D-tool bar are shown. In addition to this generic menu bar, 3D-programs may or may not have their own native menu bar which can be activated.
Undock menu items: Menu items like "spheres on" or "sticks on" in the style menu might be frequently used. For convenience, menu items can be dragged to the desktop with the mouse and are easier accessible.
Undock the viewer pane: 3D-viewers that are located inside the STRAP-application frame can be moved outside (undocking) even to a 2nd screen. For this purpose the header needs to be dragged with the mouse.
Always floating on top of other windows All Strap windows can be set "Always floating on top of all other windows". Type Ctrl+T.
Picking Atoms in the 3D-View: When atoms are clicked in the 3D-view, Strap will display a toolbar with buttons that act upon the clicked amino acid.
By picking an atom, one amino acid is selected. By picking atoms with certain modifier keys (Shift, Ctrl, Alt), more than one amino acid can be selected. This corresponds to the notion of selecting more than one files in a file browser. The modifier keys depend on the 3D-viewer.
| 3D-Viewer | Continuous selection | Discontinuous selection |
|---|---|---|
| OpenAstex | Ctrl.Shift+Click | Ctrl+Click |
| JMol | Shift+Click | Ctrl+Click |
Selecting amino acids in the alignment panel: Using the mouse or using Arrow-Left/ Arrow-Right keys together with Shift, a number of amino acids can be selected in Strap. This selection is passed to 3D. Alternatively, a residue selection can be dragged with the mouse into the 3D-view.
Adding proteins: Proteins can be added by . See MOVIE:Drag_to_another_STRAP*
Displaying Sequence Features: Sequence Features can highlighted in the 3D-view using . See MOVIE:Sequence_Features_in_3D*
3D-Superposition: 3D-Superposition allows to compare two or more protein backbones. Two options are available:
- All peptide chains in the view: One medium structure will be used as a reference. All other proteins are overlaid upon this reference peptide chain.
- All multi-chain complexes in the view: Different chains of the same PDB entry form a complex and their relative position is sustained. For superimposing two multi-chain complexes, the best structurally matching pair of chains is determined. I.E. for superimposing two trimeric G-proteins, the beta propeller structures may be selected. The superposition is computed for this pair of peptide chains and the transformation is applied to the entire complexes. Complexes might also be defined by the user or by a script - see context menu of proteins.
3D-Backbone view
[Menu-bar> Help>Selected topics>3D] The simple 3D-viewer visualizes the C-alpha trace of one or several proteins as a polygon. Helices may be drawn in red and sheets in yellow or the entire chain is drawn in one color. There are a few advantage of the full featured sophisticated viewers also available in Strap:- Starts without delay
- Uses minimal memory
- Applies transformation matrices to visualize biological molecules
Residue Selections
Residue selections are objects attached to proteins which select one or more amino acid positions from the amino acid sequence. For example dragging the mouse in the alignment pane selects a continuous chain of residues which may be pasted e.g. into a BLAST web form.Annotated residue selections
[Menu-bar> Help>Selected topics] Annotated residue selections, allow the assignment of information to specific amino acids or nucleotides of proteins. A residue annotation has a list of entries each having a type and a modifiable text. The user can change these entries and add new entries. See Modifying annotations Annotated residue selections can be created in different ways:- Selecting residues with the mouse. Right-click opens the context menu. Click the menu item
 .
. - Dragging any residue selection to the same or another protein.
Background Image
Image files and images in the browser can be dragged onto an annotated residue selection. See DRAG_LINK*Modifying annotations
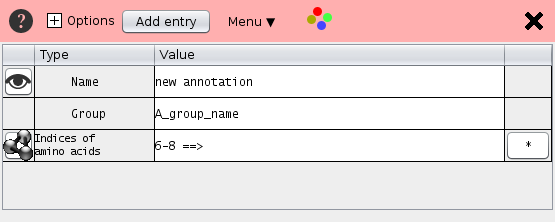
To edit a * residue annotation the menu item of the
context menu must be clicked. Alternatively the residue underlining in the alignment panel can be double clicked.
The annotation data is shown as a table. The rows contain the name, the group name, the residue positions and additional annotation.
of the
context menu must be clicked. Alternatively the residue underlining in the alignment panel can be double clicked.
The annotation data is shown as a table. The rows contain the name, the group name, the residue positions and additional annotation.
 |
-
The most important entry is Positions which defines the the selected sequence positions.
Here are some examples of valid entries
- The expression "1,3,4,6,101-103,110-112" selects the residue indices 1,3,4,6,101,102,103,110,111,112. Instead of the commas, spaces can by used.
- The expression "+2 1 3 4" selects the residues 3,5, and 6 because the preceding +2 adds an offset of 2 to all positions. The "+"-sign is the first character in this expression. For the user interface the first residue has the index "1" whereas internally STRAP starts counting at zero. A negative offset of "2" is achieved by a leading "+-2".
- The expression "1:G-3:G 5:G" selects the residues with the pdb-numbers 1,2, 3 and 5 of the chain G. If the protein has only one chain the chain identifier can be omitted like "1:-3: 5:"
- Referring to nucleotide positions: When the toggle button is pressed (default state) the indices refer to amino acid positions. Otherwise the positions indicate nucleotides in case the protein is translated from a nucleotide sequence.
-
To any group an atom specification can be appended.
This allows to select certain atoms before changing their style in the 3D-viewers.
Even though protein 3D viewers usually have a specific language for atom selection,
the atom expression used here is defined by STRAP and works for all 3D-viewers.
for example "10:-20:.CA.CB" narrows the selection to the atoms CA and CB for the residues 10 to 20. A later command such as "3D_spheres" would affect only c-alpha and c-beta atoms. There may be more than one "Atoms"-entries. Each "Atoms" specification take effect only on the following 3D-style commands but not on the previous. Asterisk can be used as a wild card like "*.CA" or "10:-20:.C". For the proper atom identifiers have a look at the PDB file.
- Atoms Certain Atoms can be specified by an expression like ".CB.CA" which means only Cα and Cβ atoms. The next 3D-command will act on these rather than on all atoms of the amino acid. When sending the commands to a 3D-program, the rows are processed sequentially. If there comes yet another Atoms-row, the previous atom-specification is replaced by the new one.
- Name Each selection has a name. Un-checking the check box deactivates the residue annotation.
- Group Several selections may be bundled in one group e.g. "active site"
 : TeXshade commands. See menu Export in the file menu.
- Note, Remark: Free text. URLs are clickable. Supports cross-links like PDB:1ryp, PUBMED:0815. The list of databases can be changed by Ctrl-click the cross-link.
- Balloon: The balloon text appears when the mouse is over the highlighted residues.
Drag and drop: Rows can be reordered with the mouse or can be dropped on other residue selections.
Export protein files
Using the export dialog (file-menu)
Single protein files can be exported in various output formats.Dragging proteins with the mouse
Proteins can be dragged from the alignment to the Desktop or the file browser. This requires dragging a protein label such as in the row header of the alignment with the mouse. Proteins can be dropped in other Desktop applications that support . They may also be dropped into another STRAP instance.By default, the original file that the protein was loaded from, is directly transferred even if the 3D orientation has been changed in Strap or the N-terminus or C-terminus have been cleaved off. This behavior can be changed with an option pane. The button to open this option pane appears in the Strap tool pane when the proteins are dragged.
Export PDF
Multiple sequence alignments can be exported to PDF and with the LaTeX extension TeXshade written by Eric Beitz (see , http://www.pharmazie.uni-kiel.de/chem/Prof_Beitz/texshade.htm).Installation
LaTeX is required. It provides the two shell commands "latex" and "pdflatex" which will be run by Strap. A graphical front end is not needed.
Exporting the sequence alignment to PDF
By pushing "Generate PDF" in the main card of the TeXshade-Dialog, two files are generated: The LaTeX file with ending .ps and the alignment file with ending .msf. These two files are then processed by the command pdflatex. The result is a pdf file. As soon as the pdf file exists, the "PDF" button to start the PDF viewer becomes active. The file path of pdflatex and of the PDF viewer can be customized.
Including the Alignment in Text-processor documents
Modern textprocessors allow insertion of PDF or Encapsulated PostScript images. For PostScript output, the respective check-box needs to be activated. Subsequently, the PostScript file (Suffix .ps) needs to be converted to Encapsulated PostScript (File suffix .eps) as described in "How do I convert PostScript to EPS?" of page http://www.postscript.org/FAQs/language/ .
Annotations
Residue selections can contain one or more annotations labeled with
.
Those entries usually contain the variables "PROTEIN" and "RESIDUES"
which stand for the current protein number and the sequence positions.
  \feature{top}{PROTEIN}{RESIDUES}{box[Red]}{peptide}
  \feature{ttop}{PROTEIN}{RESIDUES}{box[Red]}{peptide}
  \feature{bottom}{PROTEIN}{RESIDUES}{fill:$\uparrow$}{$S_{129}$}
  \feature{bbottom}{PROTEIN}{RESIDUES}{fill:X}{cleavage}
  \fingerprint{300}
|
   \feature{bottom}{PROTEIN}{RESIDUES}{fill:$\uparrow$}{$$FIRST_Aaa_{$FIRST_INDEX}$}
   \feature{bottom}{PROTEIN}{RESIDUES}{fill:$\uparrow$}{$$FIRST_A_{$FIRST_INDEX}$}
|
Plotting
Numeric values computed for each residue with a class ValueOfResidue can be plotted along the sequence alignment. Classes implementing ValueOfResidue have a getValues-method which returns a numeric value for each residue. The user chooses a class in the "plotting"-card
 .
The plot has four alternative locations: top, bottom, ttop, bbottom.
.
The plot has four alternative locations: top, bottom, ttop, bbottom.
Fixing LaTeX-errors
Like in any programming language PDF-LaTeX stops when the text contains syntax errors. LaTeX reports the line number where the error occurred. For example 1.42 indicates an error at line 42. Typically the error is an incorrect TeXshade command assigned by the user to a residue annotation. The most frequent errors are unbalanced parentheses or characters that have a special syntactical meaning like underscore or "%".
Memory limitation: With large alignments the pdflatex-run may terminate with an ... memory exceeded ...-error. No PDF-output would be generated. If this happens the LaTeX heap size must be increased. Miktex users should set pdf_mem_size to a higher values in the file miktex.ini. For other LaTeX systems the memory settings in texmf.cnf must be increased ( e.g. multiplied by 10) and the program fmtutil run as root. Typical locations of the texmf.cnf are /etc/texmf/texmf.cnf /usr/share/texmf/web2c/texmf.cnf and /usr/local/teTeX/share/texmf/web2c/texmf.cnf.
# fmtutil --byfmt=pdflatex
Publish interactive alignment
 |
1. Single web address
The web address can not only be included in web-pages, but also in e-mails and Office-documents. The generation is conducted in two steps:-
 The
parameter String is written into the first text field and can
be modified by the user. Not the sequence but the database
accession id is stored. For technical details see
http://www.bioinformatics.org/strap/createStrapLinks.html.
The
parameter String is written into the first text field and can
be modified by the user. Not the sequence but the database
accession id is stored. For technical details see
http://www.bioinformatics.org/strap/createStrapLinks.html.
-
 From the
text in the first text field the web address will be generated
using and written into the 2nd text field.
From the
text in the first text field the web address will be generated
using and written into the 2nd text field.
 The
generated web address can be tested by clicking. A new STRAP
session will be opened in web-mode and an alignment will be
loaded with the specified information.
The
generated web address can be tested by clicking. A new STRAP
session will be opened in web-mode and an alignment will be
loaded with the specified information.
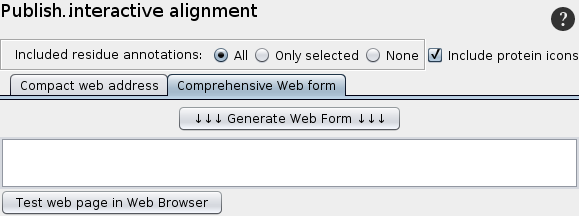
2. Web form
Since the web form has no size limitation, the entire information for the alignment can be included. The draw-back is that it can only be included in web-pages, but not in office documents or e-mails. A html-page including the web link for the selected proteins is generated.
-
The link can be tested in the web browser.
From this html code the text between the opening and closing and <body> tags can be used in any html-page.
Stdout/Stderr
Exceptions and the streams stdout and stderr
Stdout and stderr are collected in files residing in ".StrapAlign/log/" unless STRAP was started with the command line parameter "-stderr" and "-stdout". The Java-console can be switched on with ControlPanel in /local/java/jdk1.6.0_20/jre/bin/.STRAP on Windows
[Menu-bar> Help>Selected topics>Computer system]Text Editor: does not work properly. or us is used.
The directory for program settings: Since cause problems the Strap directory is named "StrapAlign" instead of ".StrapAlign".
To avoid white space in file paths on Windows XP, the home directory is "C:\StrapAlign\" instead of "%HOMEPATH\StrapAlign". An alternative directory can be provided in the file %HOMEPATH%\StrapAlign\location_of_StrapAlign.ini.
Installing Bioinformatics programs: Strap uses the of if no other specified.